Table of Contents
Overview
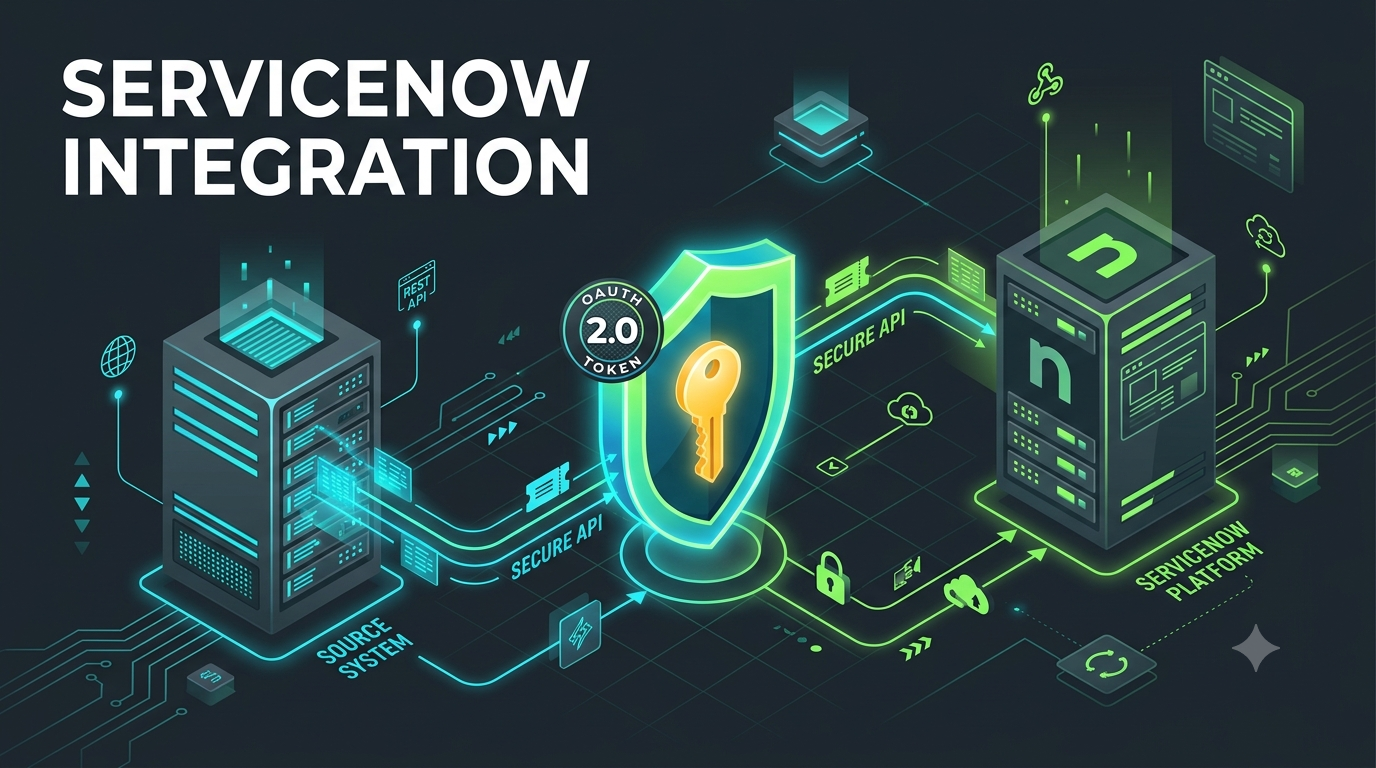
This article describes how to configure a ServiceNow-to-ServiceNow integration using the OAuth 2.0 Client Credentials (CC) grant type. This approach enables secure, machine-to-machine authentication between two ServiceNow instances without requiring user interaction or browser-based login flows.
The OAuth Client Credentials grant type is ideal for inbound integrations where a third-party OAuth client — in this case another ServiceNow instance — needs to authenticate with the ServiceNow platform programmatically.
How It Works
In this integration pattern:
- Instance B acts as the OAuth Client — it initiates requests and authenticates using its Client ID and Client Secret.
- Instance A acts as the OAuth Provider — it validates the token and processes the incoming REST API calls.
The client credentials flow works as follows: Instance B sends its Client ID and Client Secret to Instance A’s token endpoint, receives an access token, and then uses that token to make authenticated REST API calls to Instance A.
Prerequisites
- Administrator access on both ServiceNow instances.
- The system property glide.oauth.inbound.client.credential.grant_type.enabled must be enabled on the provider instance (Instance A).
- An integration user account must be created on Instance B (the client instance).
Part 1: Configure Instance B (OAuth Client)
Instance B is the outbound caller — the instance that will initiate REST API calls to Instance A. The following steps must be completed on Instance B.
Step 1 — Create an Integration User
An integration user account is required to associate with the OAuth Application Registry entry. This account acts as the service identity for the integration.
Navigate to User Administration > Users and create a new user with the following configuration:
- User ID: A meaningful identifier such as urhaantech.integration
- Identity type: Set to Machine to indicate this is a non-human, system account.
- Internal Integration User: Enable this checkbox to mark the account as an integration service account.
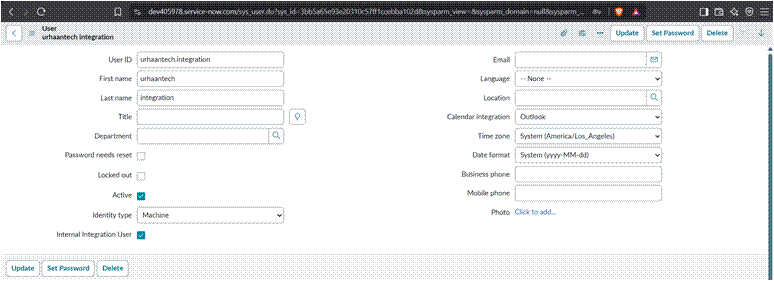
Figure 1 — Integration user configured with Identity type: Machine and Internal Integration User enabled on Instance B
After creating the user, assign the following roles from the Roles tab:
- snc_platform_rest_api_access — Grants the user permission to access the REST API.
- snc_required_script_writer_permission — Required for certain scripted REST operations.
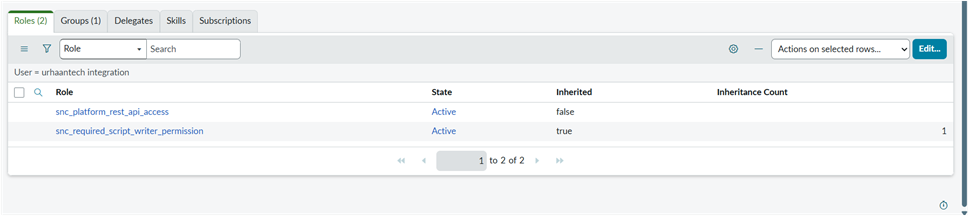
Figure 2 — Required roles assigned to the integration user
Step 2 — Create the Application Registry (OAuth Client)
Next, create an OAuth Application Registry record on Instance B. This record defines Instance B as an OAuth client that will connect to Instance A.
Navigate to System OAuth > Application Registry and create a new record with type OAuth Client. Configure the following fields:
- Name: A descriptive name such as “App for instance B”.
- Client ID: Automatically generated by ServiceNow — note this value as it will be needed on Instance A.
- Client Secret: Auto-generated or manually set — this is the shared secret used for authentication.
- OAuth Application User: Link to the integration user created in Step 1.
- Refresh Token Lifespan: Set according to your security policy (e.g., 8,640,000 seconds).
- Access Token Lifespan: Set to a shorter value such as 1,800 seconds.
- Token Format: Opaque
- Scope Restriction: Broadly scoped
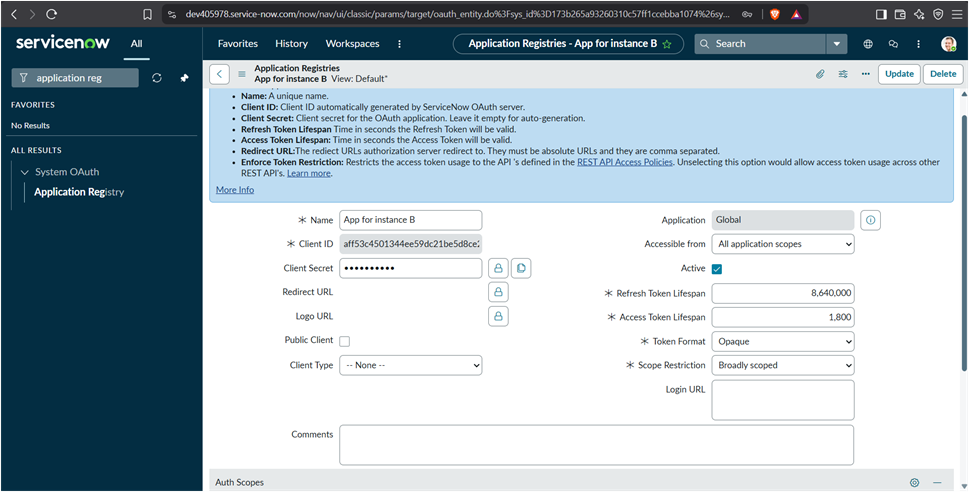
Figure 3 — OAuth Application Registry (Client type) configured on Instance B
Once saved, the Application Registry list view will confirm the entry with the OAuth Application User linked to the integration account.
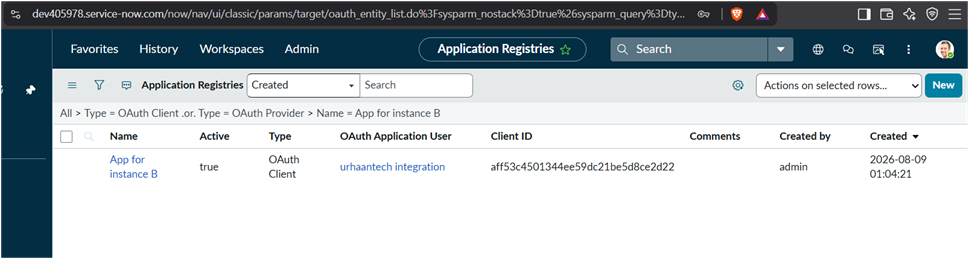
Figure 4 — Application Registries list showing the linked OAuth Application User
Part 2: Configure Instance A (OAuth Provider)
Instance A is the inbound receiver — the instance that will accept and validate REST API calls from Instance B. Several configurations are required on this instance.
Step 3 — Enable the Client Credentials System Property
By default, the inbound client credentials grant type is disabled in ServiceNow. You must explicitly enable it via a system property on Instance A.
Navigate to System Properties > All Properties and search for or create the property:
glide.oauth.inbound.client.credential.grant_type.enabled
Set the Value to true and save the record.
Note: This property controls whether Instance A will accept OAuth token requests using the Client Credentials grant type. Without this setting, token requests will be rejected.
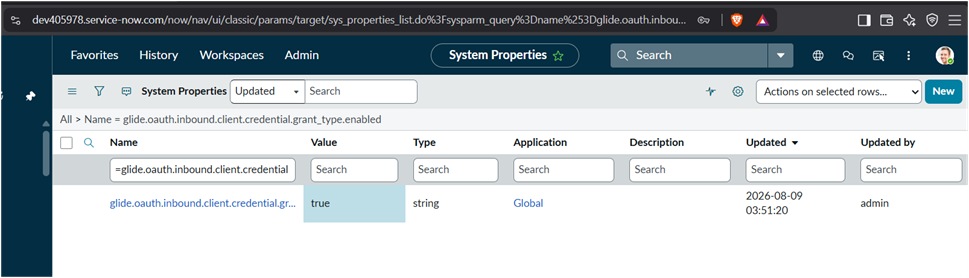
Figure 5 — System property enabled on Instance A to allow inbound client credential grant type
Step 4 — Create the Application Registry (OAuth Provider)
On Instance A, create an Application Registry entry of type OAuth Provider. This is the server-side configuration that will validate tokens presented by Instance B.
Navigate to System OAuth > Application Registry and create a new record. Configure the following:
- Name: A descriptive name such as “App for Instance A”.
- Client ID: Copy the Client ID from the registry entry created on Instance B (Step 2).
- Client Secret: Copy the corresponding Client Secret from Instance B.
- Default Grant Type: Set to Client Credentials.
- Token URL: This will auto-populate with Instance A’s OAuth token endpoint (e.g., https://<instance-a>.service-now.com/oauth_token.do).
- Send Credentials: Set to In Request Body (Form URL-Encoded).
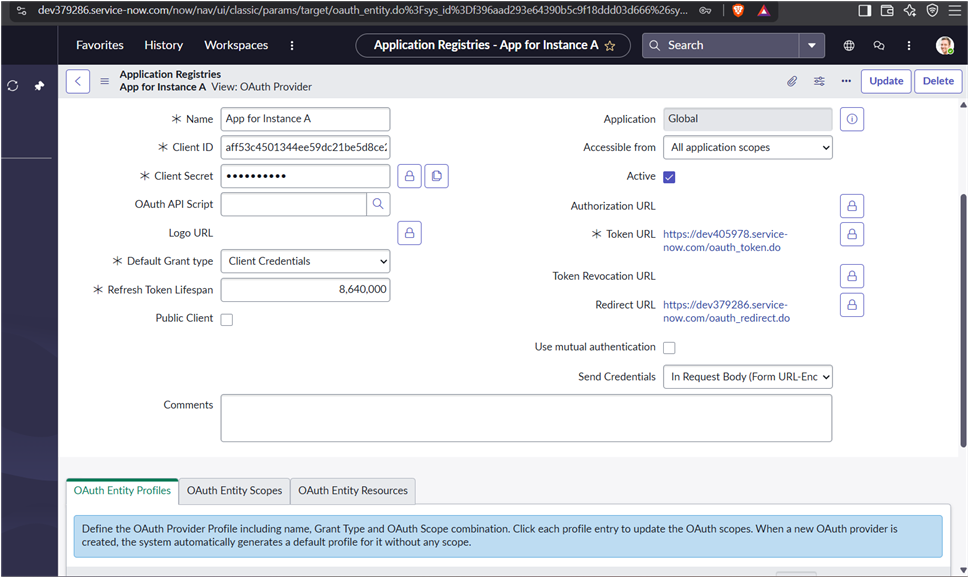
Figure 6 — OAuth Provider Application Registry configured on Instance A with Client Credentials grant type
Part 3: Configure the REST Message on Instance A
The REST Message is the outbound integration record on Instance A that defines how it will call Instance B’s API. While this may seem counterintuitive, a REST Message is needed on Instance A (the provider) to trigger calls — typically via a Business Rule — to Instance B.
Note: In this guide, the REST Message is configured on Instance A (the “provider” instance) because the Business Rule that triggers the integration lives on Instance A. The REST Message connects back to Instance B’s API endpoint.
Step 5 — Create the REST Message
Navigate to System Web Services > Outbound > REST Messages and create a new record:
- Name: A descriptive name such as “Servicenow Instance A”.
- Endpoint: The base URL of Instance B (e.g., https://dev405978.service-now.com/).
- Authentication type: OAuth 2.0
- OAuth profile: Select or create the OAuth profile linked to the Application Registry from Step 4.
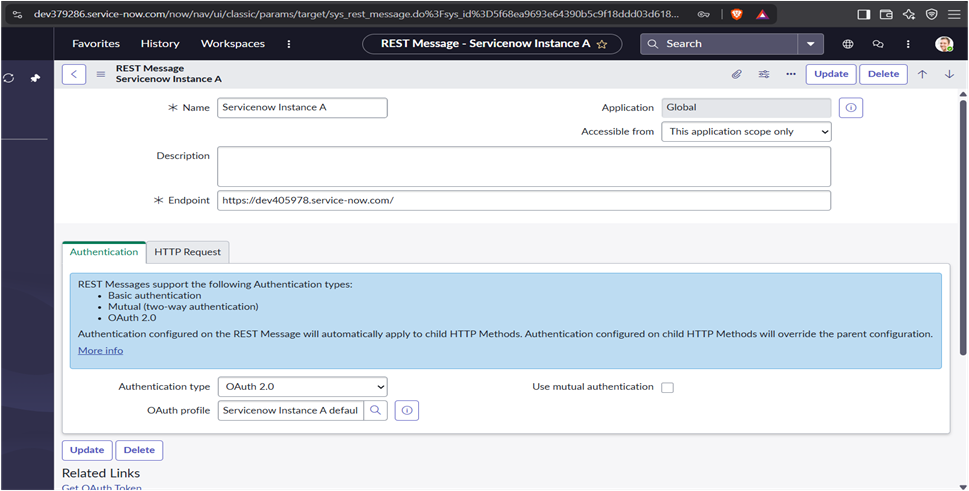
Figure 7 — REST Message configured with OAuth 2.0 authentication and the linked OAuth profile
Step 6 — Test the OAuth Token
Before proceeding, validate that the OAuth configuration is working correctly. From the REST Message record, use the Get OAuth Token link under Related Links to initiate a test token flow.
A success message reading “OAuth token flow completed successfully” confirms that Instance A can successfully authenticate with Instance B using the client credentials grant.
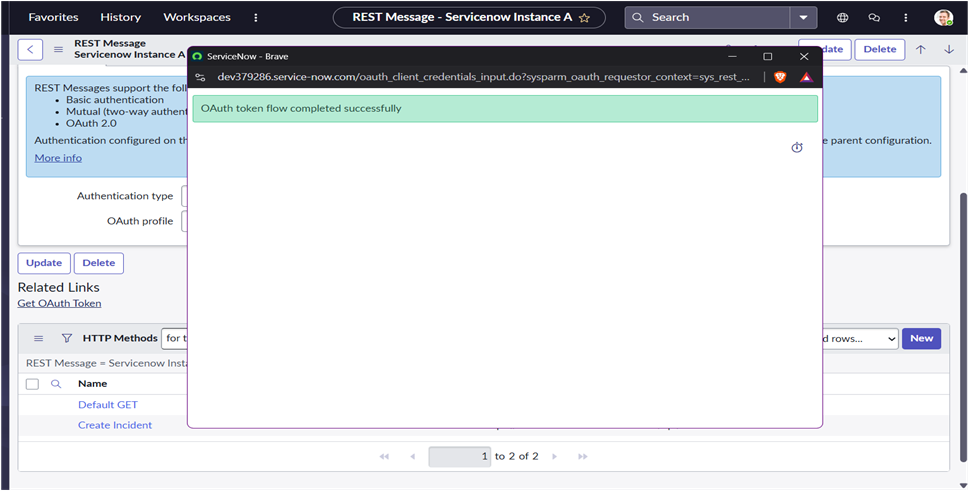
Figure 8 — OAuth token flow completed successfully, confirming authentication between the two instances
Step 7 — Create the HTTP Method (Create Incident)
Within the REST Message, define the specific API operation you want to perform. In this example, we configure a method to create an Incident on Instance B.
Click New under the HTTP Methods related list and configure:
- Name: Create Incident
- HTTP method: POST
- Endpoint: https://<instance-b>.service-now.com/api/now/table/incident
- HTTP Headers: Set Accept and Content-Type both to application/json
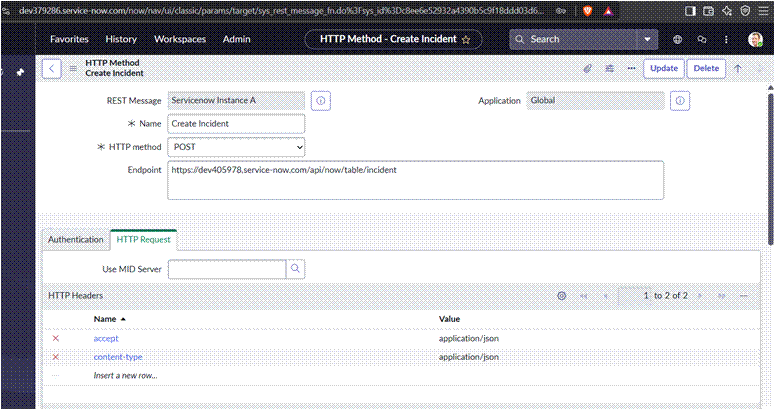
Figure 9 — HTTP Method “Create Incident” configured with POST method and the Incident Table API endpoint
Step 8 — Set the Request Body and Variable Substitution
In the HTTP Request tab of the method, define the JSON request body. Use variable substitution syntax (${variable_name}) to pass dynamic values at runtime:
{
“short_description” : “${short_desc}”
}
Define the variable substitution in the Variable Substitutions related list:
Define the variable substitution in the Variable Substitutions related list:
- Name: short_desc
- Escape type: No escaping
- Test value: test (used when running a test from the UI)
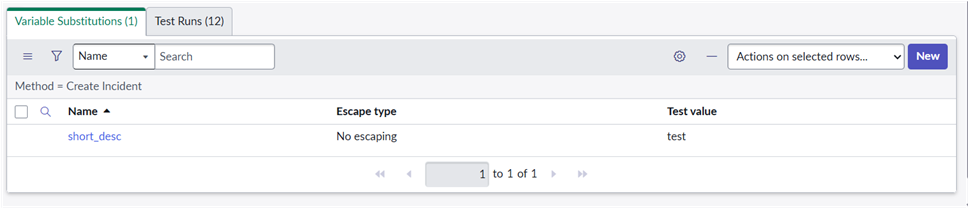
Figure 10 — Variable substitution “short_desc” defined for the Create Incident HTTP method
Part 4: Automate with a Business Rule
A Business Rule is used to trigger the REST API call automatically when a record is inserted into the Incident table on Instance A. This creates a real-time, event-driven integration between the two instances.
Step 9 — Create the Business Rule
Navigate to System Definition > Business Rules and create a new rule:
- Name: Create Incident in instance A
- Table: Incident [incident]
- Active: Enabled
- Advanced: Enabled (to use a script)
In the When to run tab, configure:
- When: async (runs after the record is committed, avoiding UI delays)
- Insert: checked (triggers when a new incident is created)
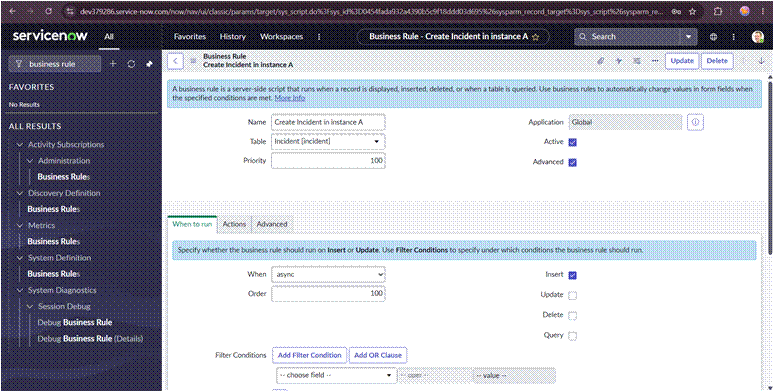
Figure 11 — Business Rule configured to run asynchronously on Insert for the Incident table
Step 10 — Write the Business Rule Script
Switch to the Advanced tab and enter the following script. This script invokes the REST Message HTTP method created in Step 7, passing the short_description of the new incident as a dynamic parameter:
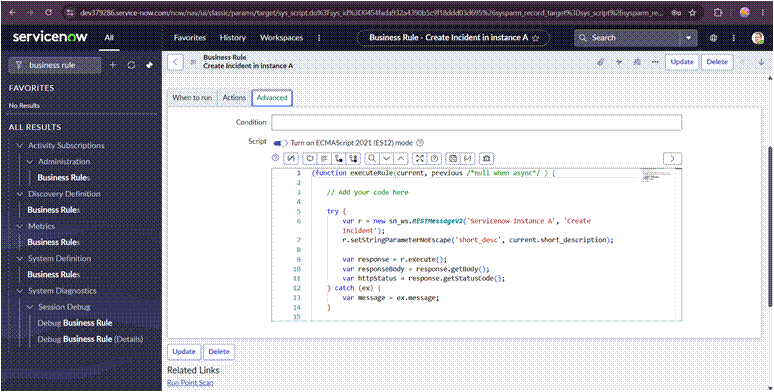
Figure 12 — Business Rule script calling the REST Message to create an incident on Instance B
The script uses the sn_ws.RESTMessageV2 API to:
- Reference the REST Message by name (“Servicenow Instance A”) and the specific HTTP method (“Create Incident”).
- Pass the current record’s short_description field as the short_desc parameter.
- Execute the REST call and capture the response body and HTTP status code.
Part 5: Testing and Verification
With all components configured, it is time to verify the end-to-end integration by triggering a real incident creation on Instance A and confirming it appears in Instance B.
Step 11 — Create a Test Incident on Instance A
Navigate to Incident > Create New on Instance A and submit a new incident. Populate the Short description field with a recognizable value such as “This incident should be created in instance A”.
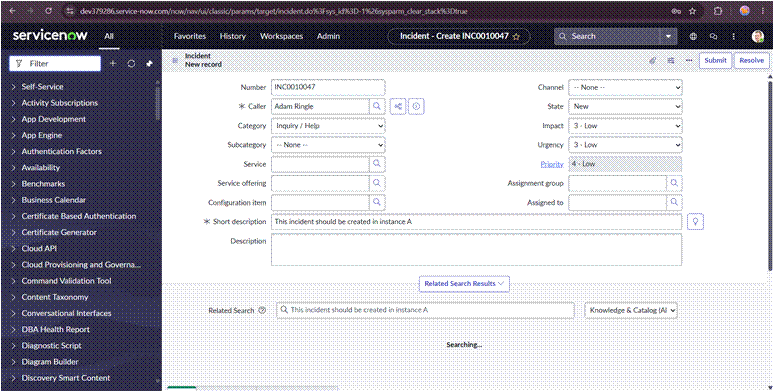
Figure 13 — Test incident created on Instance A with a descriptive short_description value
Step 12 — Verify the Incident on Instance B
Switch to Instance B and navigate to Incident > All. The incident created on Instance A should appear in the list, having been created automatically by the Business Rule via the REST API call authenticated through OAuth 2.0.
In the example below, INC0010295 with the description “This incident should be created in instance A” is visible in Instance B’s incident list, confirming the integration is working end-to-end.
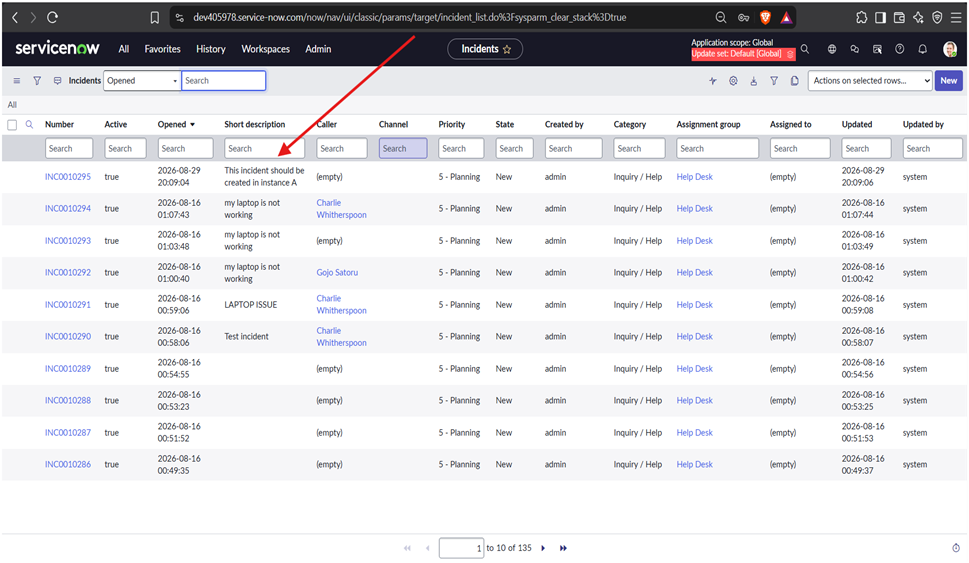
Figure 14 — Incident successfully created in Instance B via the OAuth 2.0 integration from Instance A
Summary
This article walked through the complete configuration of a ServiceNow-to-ServiceNow integration using OAuth 2.0 Client Credentials. The key components configured were:
- Instance B (Client): Integration user, OAuth Application Registry (OAuth Client type), and associated roles.
- Instance A (Provider): System property to enable inbound client credentials, OAuth Application Registry (OAuth Provider type), REST Message with OAuth 2.0 authentication, HTTP Method for creating incidents, and a Business Rule to trigger the integration.
This pattern provides a secure, scalable way to integrate multiple ServiceNow instances without storing user credentials or relying on password-based authentication. The OAuth 2.0 Client Credentials flow is best suited for server-to-server integrations where a trusted system account acts on behalf of the integration rather than an individual user.
At UrhaanTech, we specialize in implementing and optimizing ServiceNow solutions, including service now integrations. Whether you need assistance with custom configurations, workflows, or overall ServiceNow optimization, our experts are here to help
. Contact UrhaanTech today to ensure a smooth, secure, and efficient ServiceNow experience!