
Encrypting Attachments Using Column Level Encryption (CLE) in ServiceNow
Overview
Column Level Encryption (CLE) is a free ServiceNow plugin that has evolved significantly over the years. Initially, it allowed encryption linked to roles, but it now provides a more mature approach that includes key lifecycle management and control over encryption methods. While the free CLE plugin offers powerful encryption options, there is also a paid version, Column Level Encryption Enterprise (CLEE), which adds additional features.
This article focuses on how to encrypt attachments using the free version of CLE. While CLEE offers similar functionality, it provides more advanced options for managing encryption.
Configuring the Basics
To begin working with CLE, you first need to elevate your privileges to the security_admin role. This allows you to manage encryption settings and configurations.
Elevate to Security Admin:
- Navigate to your user profile and select “Elevate Roles.”
- Check the security_admin box to elevate your privileges.

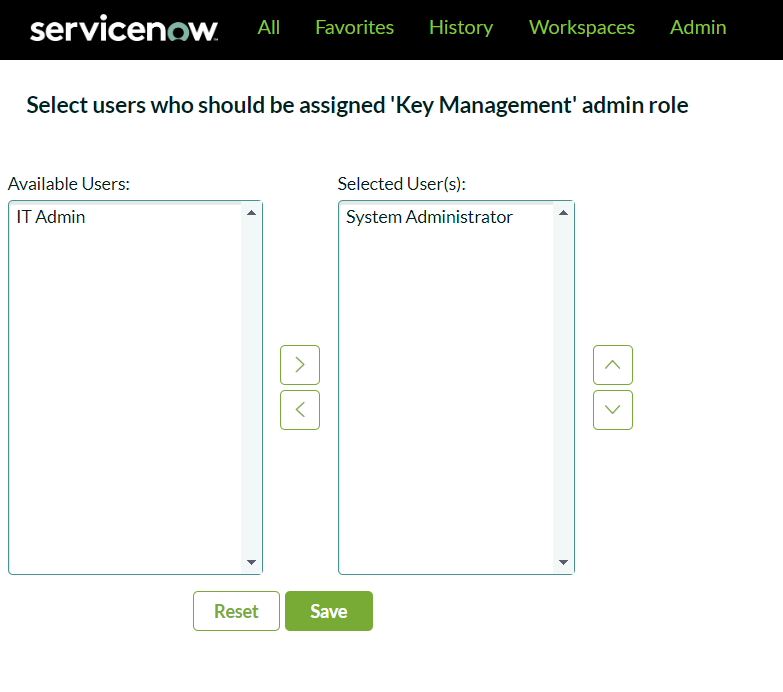
3. Key Management Administration:
- Go to System Security > Key Management Administration.
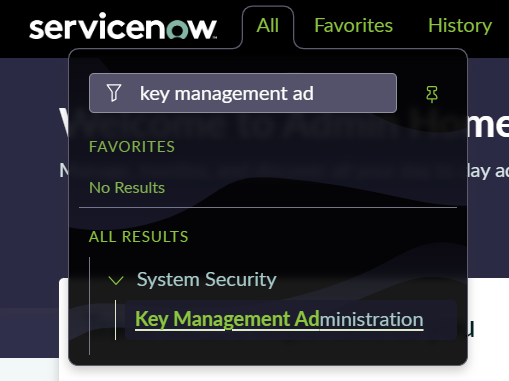
- Assign the sn_kmf_admin role to an administrator. In this example, we’ll assign it to the System Administrator. With this role assigned, administrators can grant encryption-related roles and configure settings for modules and fields
With this role assigned, administrators can grant encryption-related roles and configure settings for modules and fields.
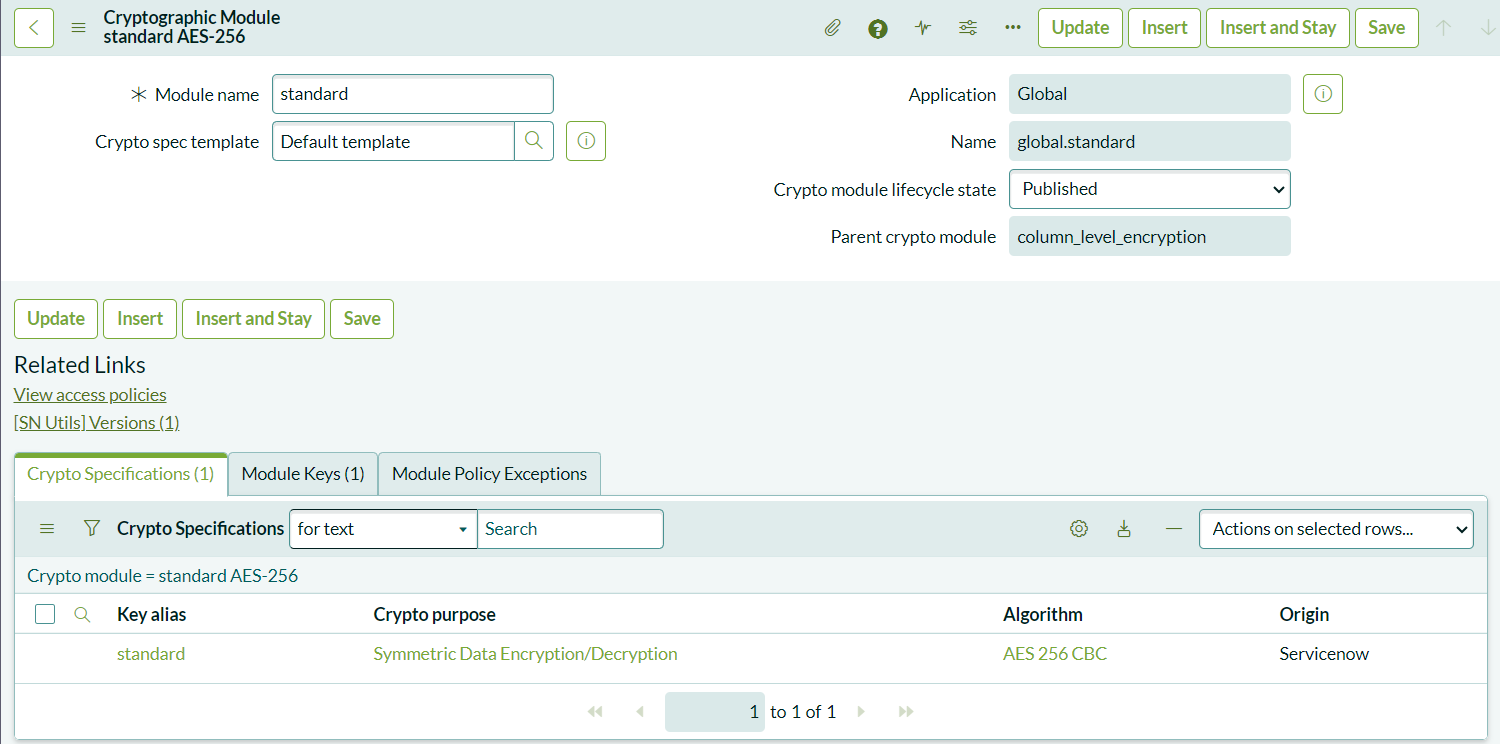
Creating a Cryptographic Module
Once you’ve assigned the role, log out and back in to apply the changes. Now, it’s time to configure Cryptographic Module:
- Navigate to System Security > Field Encryption > Field Encryption Modules.
- Create a new module by selecting “New.” This will allow you to configure encryption for attachments and fields.

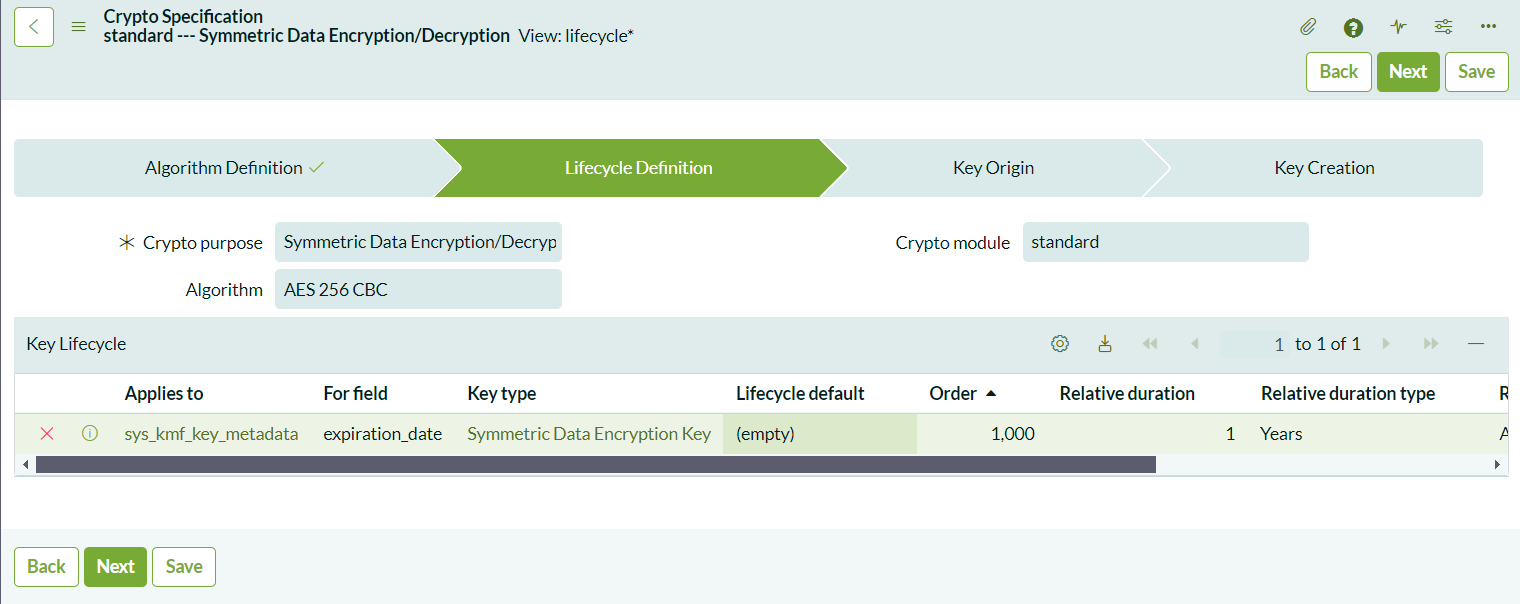
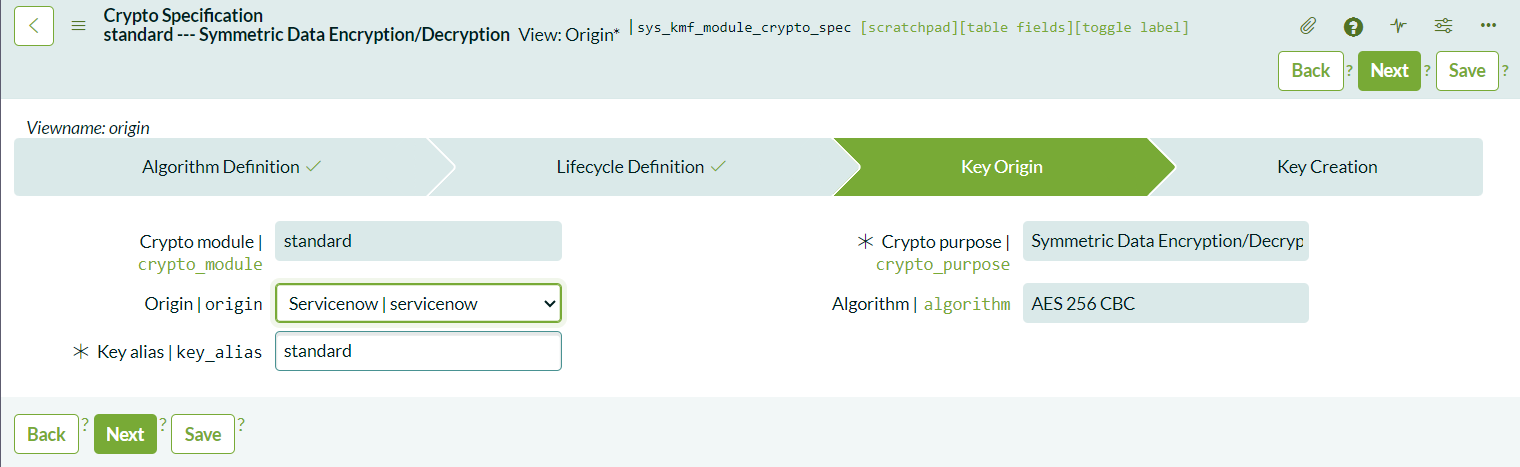
Configuring the Crypto Specifications
Under the Crypto Specifications section, you can customize the encryption algorithm and key lifecycle:
- Select the Encryption Algorithm: The default algorithm is AES 256 CBC. You can keep this default or select another algorithm as per your security requirements.
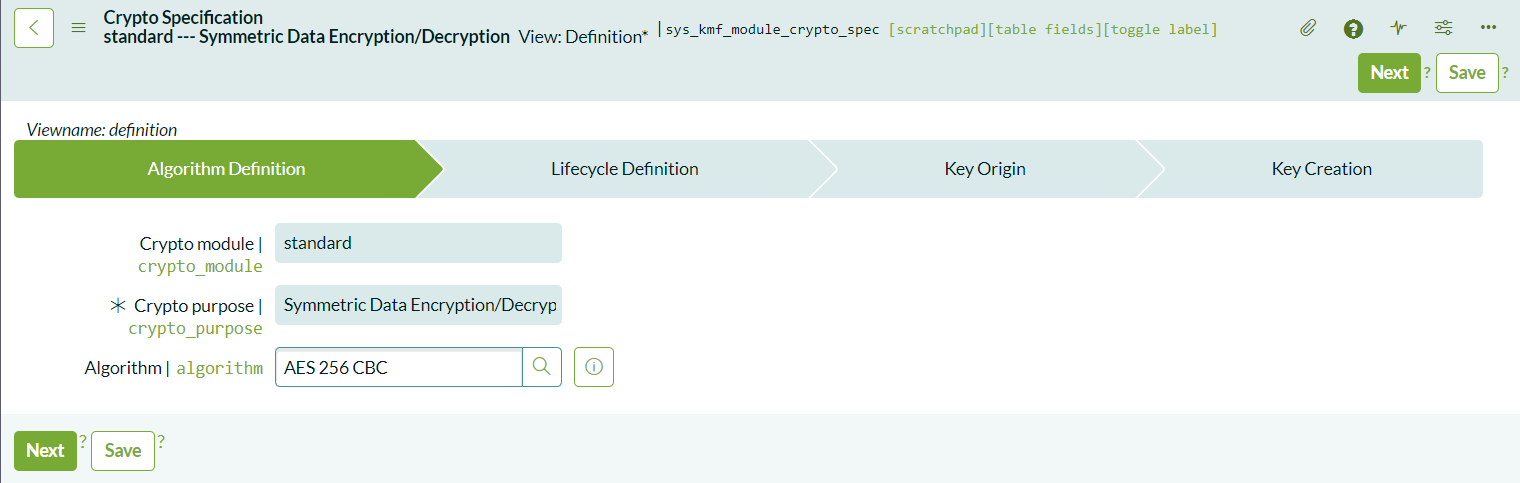
- Configure Key Lifecycle: Define when the key should expire. For example, you can set it to expire 1 year after creation.

- Choose Key Origin: In CLE, the only available option is ServiceNow for key storage. CLEE users can store keys externally.

After completing these steps, a summary of your configuration will be displayed. Click on the generate key the system will automatically generate a key and link it to the cryptographic module.
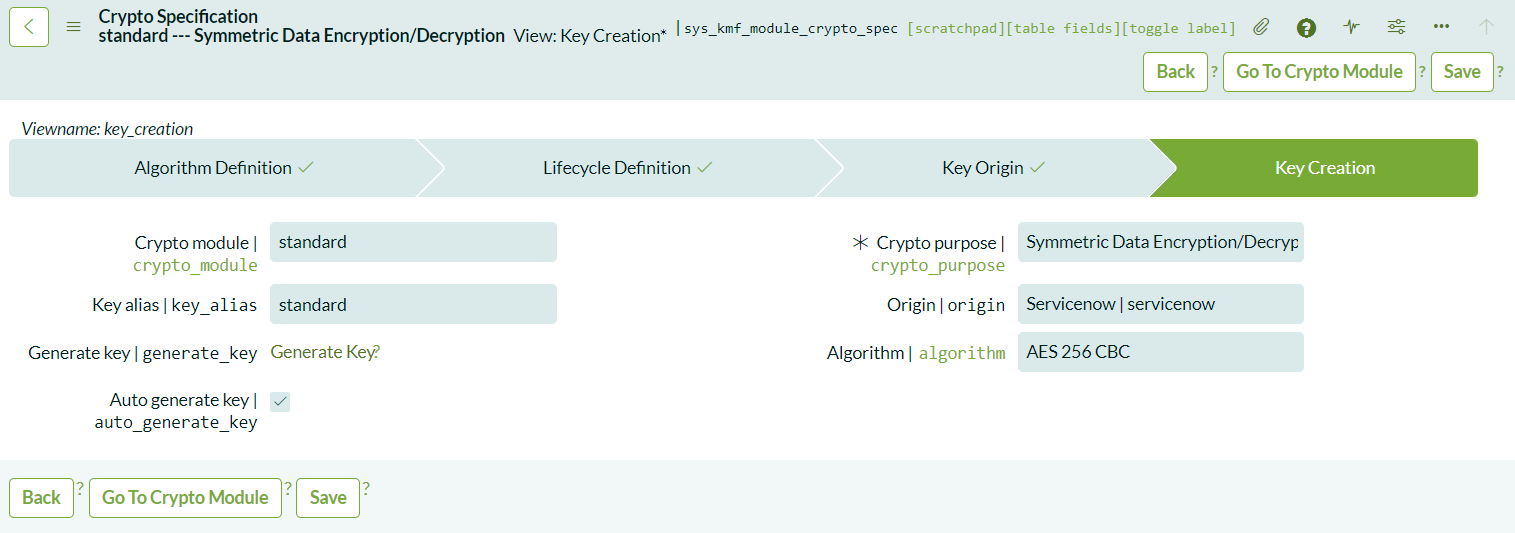
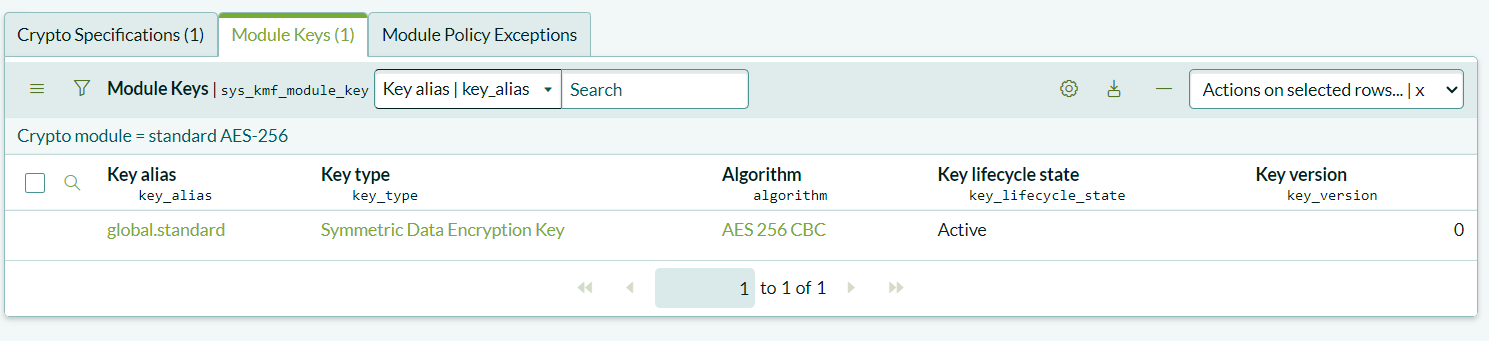
Managing the Key
You can now return to the Cryptographic Module to view the generated key. From here, you can manage the key lifecycle by renewing, rotating, revoking, or suspending the key as needed.

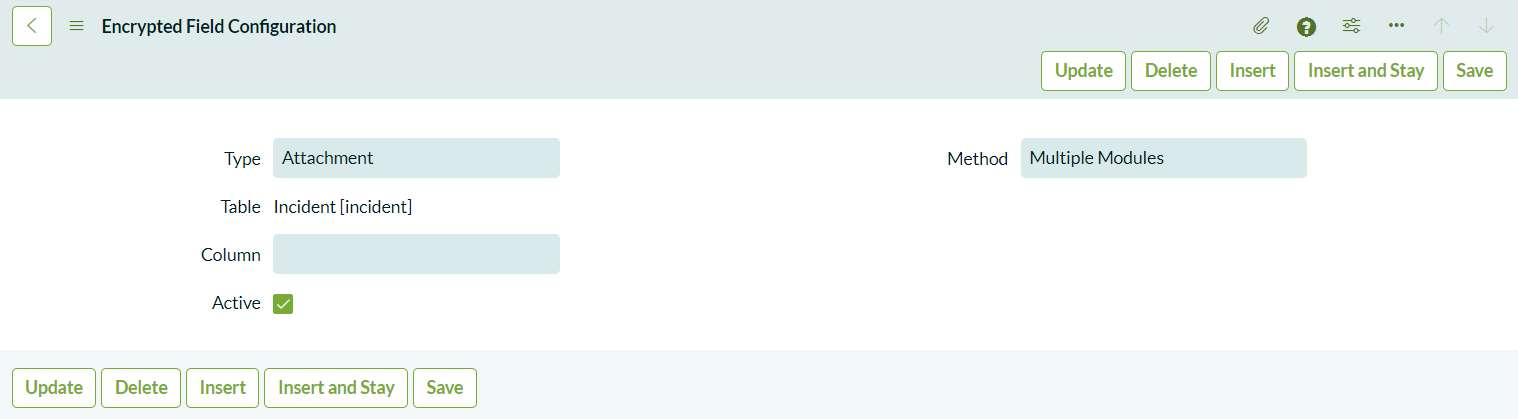
Creating the Encrypted Field Configuration Record
Next, configure when the module and key will be used by creating an Encrypted Field Configuration record:
- Navigate to System Security > Field Encryption > Encrypted Field Configurations.
- Create a new record with the Type set to Attachment and the Method set to Multiple Modules. This configuration allows users to choose whether to encrypt attachments or leave them unencrypted for end users.
Selecting Multiple Modules gives agents the flexibility to encrypt or not encrypt attachments. If you choose Single Module, all attachments will be encrypted with the selected module, which might restrict visibility for users without the necessary permissions.

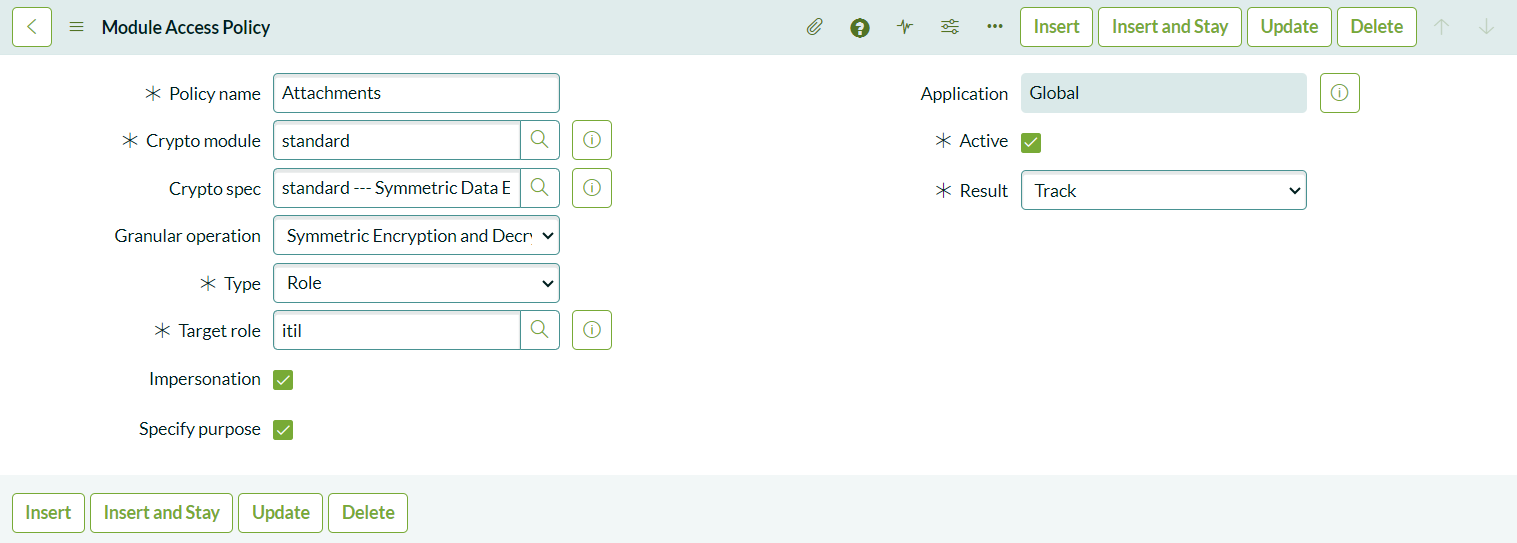
Defining Module Access Policies
To control who can encrypt and decrypt attachments, create a Module Access Policy:
- Navigate to Key Management > Module Access Policies > All.
- Create a new policy with the Type set to Role and assign the itil role. Users with this role can encrypt and decrypt attachments using the selected cryptographic module.
Ensure that the Result is set to Track to allow the operation. You can also enable Impersonation so that administrators can impersonate users with the role and view attachments. If you want to restrict this, uncheck the impersonation option.
Showing the Results
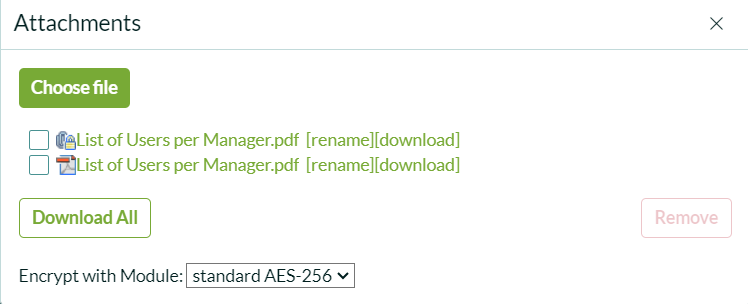
Now that everything is set up logged as the user with itil role, go to an incident and attach a new file. A dropdown menu labeled Encrypt with Module will appear, allowing you to select the encryption module or choose None to leave the attachment unencrypted for end users.

Encrypted attachments will be marked with a lock icon. It’s important to note that encrypted attachments will not be shared with end users via email, as encryption conditions cannot be validated outside of ServiceNow. However, unencrypted files will still be shared as usual.
Encrypting Attachments Using Column Level Encryption (CLE) in ServiceNow
Overview
Column Level Encryption (CLE) is a free ServiceNow plugin that has evolved significantly over the years. Initially, it allowed encryption linked to roles, but it now provides a more mature approach that includes key lifecycle management and control over encryption methods. While the free CLE plugin offers powerful encryption options, there is also a paid version, Column Level Encryption Enterprise (CLEE), which adds additional features.
This article focuses on how to encrypt attachments using the free version of CLE. While CLEE offers similar functionality, it provides more advanced options for managing encryption.
Configuring the Basics
To begin working with CLE, you first need to elevate your privileges to the security_admin role. This allows you to manage encryption settings and configurations.
Elevate to Security Admin:
- Navigate to your user profile and select “Elevate Roles.”
- Check the security_admin box to elevate your privileges.

3. Key Management Administration:
- Go to System Security > Key Management Administration.

- Assign the sn_kmf_admin role to an administrator. In this example, we’ll assign it to the System Administrator. With this role assigned, administrators can grant encryption-related roles and configure settings for modules and fields

With this role assigned, administrators can grant encryption-related roles and configure settings for modules and fields.
Creating a Cryptographic Module
Once you’ve assigned the role, log out and back in to apply the changes. Now, it’s time to configure Cryptographic Module:
- Navigate to System Security > Field Encryption > Field Encryption Modules.
- Create a new module by selecting “New.” This will allow you to configure encryption for attachments and fields.
Configuring the Crypto Specifications
Under the Crypto Specifications section, you can customize the encryption algorithm and key lifecycle:
- Select the Encryption Algorithm: The default algorithm is AES 256 CBC. You can keep this default or select another algorithm as per your security requirements.

- Configure Key Lifecycle: Define when the key should expire. For example, you can set it to expire 1 year after creation.
- Choose Key Origin: In CLE, the only available option is ServiceNow for key storage. CLEE users can store keys externally.
After completing these steps, a summary of your configuration will be displayed. Click on the generate key the system will automatically generate a key and link it to the cryptographic module.

Managing the Key
You can now return to the Cryptographic Module to view the generated key. From here, you can manage the key lifecycle by renewing, rotating, revoking, or suspending the key as needed.
Creating the Encrypted Field Configuration Record
Next, configure when the module and key will be used by creating an Encrypted Field Configuration record:
- Navigate to System Security > Field Encryption > Encrypted Field Configurations.
- Create a new record with the Type set to Attachment and the Method set to Multiple Modules. This configuration allows users to choose whether to encrypt attachments or leave them unencrypted for end users.
Selecting Multiple Modules gives agents the flexibility to encrypt or not encrypt attachments. If you choose Single Module, all attachments will be encrypted with the selected module, which might restrict visibility for users without the necessary permissions.
Defining Module Access Policies
To control who can encrypt and decrypt attachments, create a Module Access Policy:
- Navigate to Key Management > Module Access Policies > All.
- Create a new policy with the Type set to Role and assign the itil role. Users with this role can encrypt and decrypt attachments using the selected cryptographic module.
Ensure that the Result is set to Track to allow the operation. You can also enable Impersonation so that administrators can impersonate users with the role and view attachments. If you want to restrict this, uncheck the impersonation option.

Showing the Results
Now that everything is set up logged as the user with itil role, go to an incident and attach a new file. A dropdown menu labeled Encrypt with Module will appear, allowing you to select the encryption module or choose None to leave the attachment unencrypted for end users.

Encrypted attachments will be marked with a lock icon. It’s important to note that encrypted attachments will not be shared with end users via email, as encryption conditions cannot be validated outside of ServiceNow. However, unencrypted files will still be shared as usual.

