
Overview
The COE Security Policy feature in ServiceNow Human Resources Service Delivery (HRSD) allows administrators to control access to sensitive HR data by defining which user groups can view, edit, or delete specific HR cases or services.
Each policy applies to a Center of Excellence (COE), such as HR Talent Management, Employee Relations, or Payroll, and can be configured for different levels of access.
Why Use COE Security Policies
COE Security Policies help ensure:
- Compliance with data privacy and confidentiality standards.
- Controlled access to HR case data, such as background checks or disciplinary cases.
- Enforcement of “least privilege” principles, ensuring only authorized users can view or modify certain information.
Accessing the COE Security Policy Configuration
- Navigate to All > HR Administration > COE Security Configuration.
- Select COE Security Policy from the list.
- Click New to create a new policy or open an existing one to edit.
Creating a COE Security Policy
Step 1. Define Basic Information
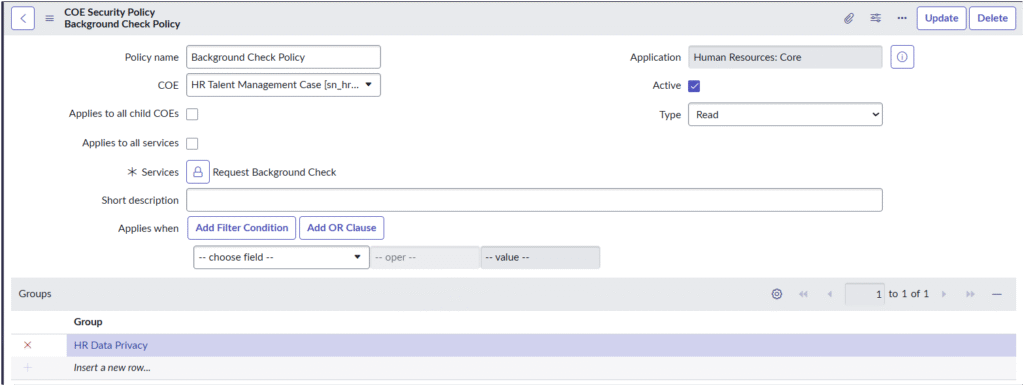
- Policy name: Enter a descriptive name (e.g., Background Check Policy).
- COE: Select the COE this policy applies to (e.g., HR Talent Management Case).
- Application: Automatically populated as Human Resources: Core.
- Active: Check this box to activate the policy.
- Type: Choose the access type:
- Read – controls who can view the data.
- Write – controls who can modify the data.
Step 2. Assign Services
If the policy applies to a specific HR service:
- Click the lock icon next to Services.
- Select the service (e.g., Request Background Check).
- Leave this blank if the policy applies to all services in the COE.
Step 3. (Optional) Define Filter Conditions
Use Add Filter Condition to narrow when this policy applies.
Example:
- Applies when → Country is United States
This ensures the policy is enforced only for cases from the U.S.
Step 4. Assign Groups
Under the Groups section:
- Click Insert a new row.
- Choose the user group(s) that should have access (e.g., HR Data Privacy).
- You can add multiple groups if needed.
Step 5. Save the Policy
Click Update (for existing policies) or Submit (for new ones).
The policy will take effect immediately for all new and existing cases that meet the defined conditions.
Example: Background Check Policy
| Field | Example Value |
|---|---|
| Policy name | Background Check Policy |
| COE | HR Talent Management Case |
| Type | Read |
| Services | Request Background Check |
| Groups | HR Data Privacy |
Result: Only members of the HR Data Privacy group can read or view background check requests.
Best Practices
- Always test new policies in a sub-production instance before deploying to production.
- Keep policies simple and specific — one policy per use case.
- Review group memberships regularly to ensure only authorized users retain access.
- Document each policy for audit and compliance purposes.
Troubleshooting Tips
- If users can’t access cases they should: verify the policy type (Read/Write) and group membership.
- If the policy seems not to apply: ensure “Active” is checked and the COE/service is correctly selected.
- Use the COE Security Diagnostics module (if available) to analyze access issues.
