
Here’s a step-by-step article on Case Creation Configuration, based on the provided images:
This guide will walk you through the process of configuring case creation settings, focusing on the “sn_hr_core_case” context as shown in the provided screenshots. These configurations allow you to define how employees are searched, their information displayed, and how cases are ultimately created within your system.
Accessing Case Creation Configuration:
- Navigate to the “Case Creation Configuration” section within your system. (The exact path may vary, but it’s typically found under HR Case Management or similar administrative settings). You should see a screen similar to the provided images with “sn_hr_core_case” indicated.
General Settings (Applicable across all tabs):
- Page size: This setting (visible at the top of all tabs) determines the number of results displayed per page in searches or lists. The default value is 10.
- Minimum input length: This sets the minimum number of characters a user must type into a search field before results start appearing. The default value is 3.
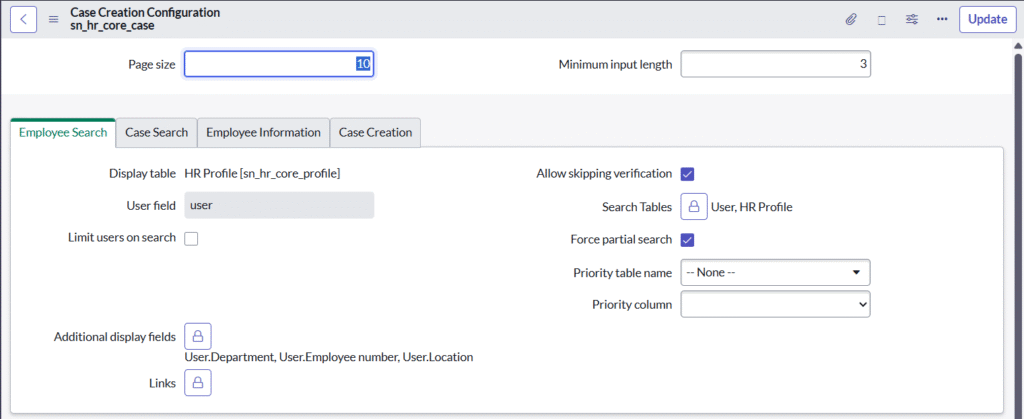
Step 1: Employee Search Configuration
This tab allows you to define the fields used when searching for employees to associate with a case.
- Click on the “Employee Search” tab.
- (No specific fields are visible in the provided image for this tab, but typically you would configure fields like “Name”, “Employee ID”, “Email”, etc., that users can search by.)
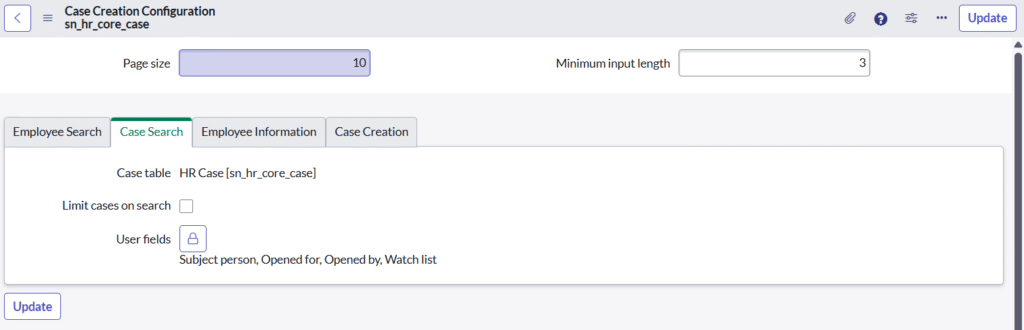
Step 2: Case Search Configuration
This tab focuses on how existing cases can be searched.
- Click on the “Case Search” tab.
- Case table: This field indicates the table where case information is stored. In this example, it’s
HR Case [sn_hr_core_case]. - Limit cases on search: This checkbox, if selected, would likely limit the scope of case searches based on predefined criteria (e.g., only show cases opened by the current user).
- User fields: These are the fields that users can utilize when searching for cases. The example shows:
Subject personOpened forOpened byWatch list
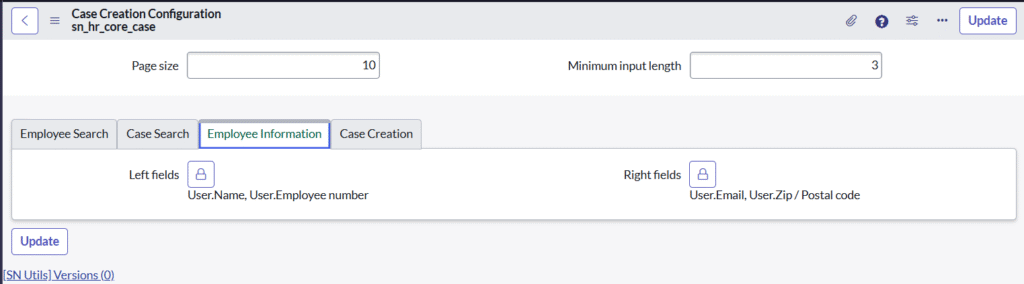
Step 3: Employee Information Configuration
This tab dictates which employee details are displayed once an employee is selected or found.
- Click on the “Employee Information” tab.
- Left fields: These fields will appear on the left side of the employee information display. In the example, these are:
User.NameUser.Employee number
- Right fields: These fields will appear on the right side of the employee information display. In the example, these are:
User.EmailUser.Zip / Postal code
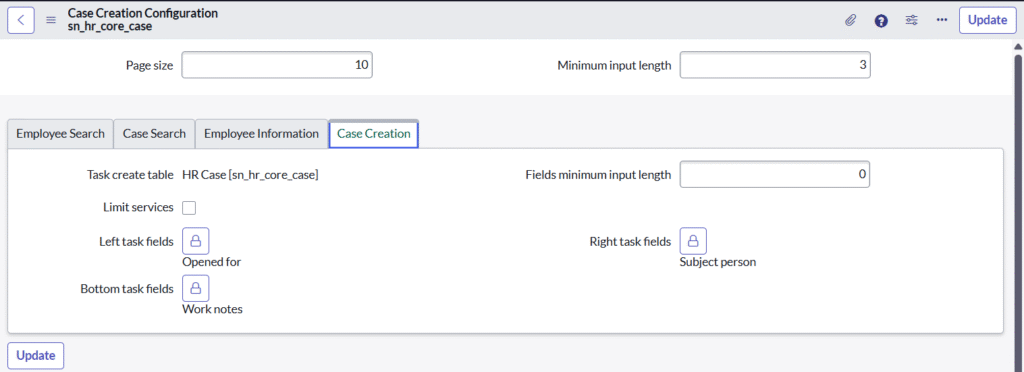
Step 4: Case Creation Configuration
This is where you define the core settings for creating a new HR case.
- Click on the “Case Creation” tab.
- Task create table: This field specifies the table where the new HR case will be created. In this instance, it’s
HR Case [sn_hr_core_case]. - Fields minimum input length: This sets the minimum input length for fields specifically related to task creation. The example shows 0, meaning no minimum length is required for these fields.
- Limit services: If this checkbox is selected, it would likely restrict the types of services that can be selected when creating a case, potentially based on the subject person or other criteria.
- Left task fields: These fields will be displayed on the left side of the case creation form. The example shows:
Opened for
- Right task fields: These fields will be displayed on the right side of the case creation form. The example shows:
Subject person
- Bottom task fields: These fields will appear at the bottom of the case creation form. The example shows:
Work notes
Saving Your Configurations:
After making any changes on any of the tabs, remember to click the “Update” button (located at the top right or bottom left of the screen) to save your configurations.
By following these steps, you can effectively configure the various aspects of case creation within your system, streamlining the process for your HR team and improving data accuracy.
